Showing posts with label eggs. Show all posts

Saturday, January 13, 2018

Scrambled Eggs with Green Peppercorns & Feta

Ingredients

(serves 2)

5-6 eggs

2 small shallots
1 tbsp green peppercorns (pickled in brine)

goat-milk feta (crumbled loosely)

butter
salt
pinch of black pepper

Recipe

There are only two tricks here.

One is that half the green peppercorns must be loosely crushed in a mortar and pestle so that the scent pervades the eggs and the rest left whole to be crunchy.

The second one is two slightly under-salt the eggs since the salty feta will be sprinkled on top.

Heat up some butter in a pan. Add the shallots and the green peppercorns (crushed and whole.) You should have a amazingly rich smell come up through the pan. Add the eggs and scramble them into large curds until soft.

Serve at once sprinkling the feta sprinkled on top.

Friday, October 28, 2016

Pad See Ew (ผัดซีอิ๊ว)

This dish is a favorite in Thai restaurants everywhere and the CC has spent plenty of money on it in increasingly dubious renditions. It was time to take the bull by the horns (or the wok by the handle) and get it right.

There is one massive hurdle that all home chefs are going to have to jump over. Your stove (and the CC's too!) simply don't generate enough heat. They don't pump out enough BTU's. There is no way to recover from this and compare your dish with the street food that it is. You'll get a very good approximation but you'll never match the street.

(If you happen to have one of those professional ranges, the CC is jealous as all hell.)

There is another thought that the CC has had on and off over the years.

The CC was near Chinatown for jury duty when he thought that he should he make this recipe. He did pick up one or two of the ingredients that he was missing. It would've been effortless to pick up the Chinese broccoli since it was plentiful and cheap. However, the CC knew that he had a ton of kale with splendid stalks in his fridge.

It's very easy to just duplicate a recipe but in order to get to the next level and understand its internal grammar, you must understand what makes it really tick.

This recipe is street food. Do you genuinely believe they care about anything more than what makes them a profit and what is locally available?

There is a secondary point. The first time the CC made it for himself (solo siempre solamente solo), he fucked up so spectacularly that it was embarrassing. What was interesting was that even though the noodles were absolutely inedible, the chicken, kale, eggs and sauce were absolutely delicious. Noodles got discarded and the rest was more amazing than any restaurant could make.

So the flavors had been nailed but the texture had some issues. No problem. Tried a few days later. Got there.

(On a related note, why don't food writers talk about their failures? Failures are vastly more instructive than success.)

The dish literally just means "stir-fried with soy sauce". Its name betrays its Chinese origins. You'll see the same dish as char kway teow in Singapore and Malaysia or lard na in Laos. However, just with a few tweaks, the dish has been made "Thai" and it's truly amazing how such small tweaks can make a dish "native". It also points out how immigrants have made cuisine richer through cross-pollination.

There's a massive difference between Chinese broccoli and anything else you could use. It's softer and eminently workable as a stir-fry.

Kale would work as would just regular broccoli. What would totally kill would be broccoli rabe. The trick for the home cook since they don't have the heat for the wok is to make sure the stalks and the florets have the right texture. French chefs have been dealing with this forever. It's called par-boiling. The CC will give you the general parameters but for once you will have to par-boil for yourself. Early winter kale is very different from later winter stalk-y kale. There is no way to standardize. Just par-boil until the stuff is "barely chewy" and then drain, dry completely before you stir-fry.

For the record, the kale slayed. The CC's intuition was absolutely on target. The darker slightly more bitter taste held up much more to the sweetness and umami of the stir-fry and made it vastly more interesting. The balance of flavors corresponds to the Thai ideal.

Lunch is served.

Ingredients

(serves 1 - read note about scaling)

rice noodles (sen yai)

1 cup Chinese broccoli (gai lan)

1-2 cloves garlic (minced)
1/4 cup chicken (sliced against the grain)
1 egg (beaten)

1 tbsp dark soy sauce
1/2 tbsp light soy sauce
1/2 tbsp fish sauce
1/2 tbsp oyster sauce
black pepper
sugar

peanut oil

Note 1: Make sure that the total "wet" sauce is no more than 2 1/2 tbsp per serving. You will never get your home wok hot enough to counter that. This is IMPORTANT.

Note 2: Because of the above, you may need to use salt to balance out the sugar. Normally, you'd just use more soy sauce or fish sauce but it's not going to work if you make the stuff wetter than necessary.

Note 3: This ain't no "health dish". You'll need to add some extra oil so that the stuff doesn't stick.

Note 4: The max "scaling" for a home cook is 2 portions. There is just no way to get the wok hotter and make it work. You'll have to clean the wok and start over for more.

Note 5: The original recipe calls for "white pepper". It's a Thai aesthetic thing except this particular sauce is black. Ain't no one that got time for such shenanigans. Just use black pepper finely ground.

Note 6: The rice noodles (unless fresh which are hard to get) must be par-boiled according to the instructions. They must be drained, dried and separated.

Note 7: They also add carrots sliced very thin (stir-fry, stir-fry!) steeply on the diagonal. Highly recommended not just for the color pop but also the taste and nutrition.

Note 8: This is a stir-fry. The drier you get your ingredients, the more success you will have. Invest in paper towels.

Note 9: Thank you, David Thompson.

Recipe

The recipe is quite straightforward but do try and follow it. Make sure everything is diced and ready to in quickly.

Mix all the sauces in a container. Taste. Modify according to what you like.

Heat the wok. Just let it heat for at least 5-7 minutes.

Add 1-2 tbsp peanut oil. When it is shimmering, add the garlic and immediately add the chicken. Stir quickly. Add the egg and mix it up. Push it to the edge of the wok. Add the stalks first and fry for a bit. Then the leaves. Push everything to the edge.

Add the rice noodles which have been par-cooked. Stir and separate. You may need to use your hands and add an extra 1-2 tbsp of peanut oil.

Let the mixture stir for a while. Once the noodles have caramelized a bit, add the sauces and stir-fry for a minute or two. Serve at once.

This recipe has no shelf life.

Thursday, October 20, 2016

Watalappam

This dessert (also frequently transliterated as watalappan) is probably one of the CC's favorites even though the CC is not much of a dessert person to start with!

It's related functionally to the very Spanish flan which is another one of the CC's favorites.

The massive difference between the two is that the Sri Lankan dessert substitutes coconut milk for the cream and milk in the original. This changes the chemistry in a significant way. It also adds a ton of "sweet" spices that flourish on the island. The sugar is substituted by a very specific palm jaggery which adds a smoky flavor and brown color to the product.

Flan is notoriously hard to make. It's very finicky about the percentage of fat in the cream and the milk and the water content. Flubs are common and the act of making it requires real skill.

Almodóvar films an entire flan recipe in his movie Volver. It's both a love ode to the wonderful dessert and a character study in the great tradition of silent films. By eavesdropping on a character who's clearly very talented at making it, and watching her do the thing she loves, we learn more about her than could be inferred from mere dialog.

The chemistry of coconut milk is much simpler than that of cream plus milk. Some genius made the substitution historically and it's a knockout since the proportions in coconut milk are exactly right to get the correct consistency and hence, flubbing is kept to at a minimum.

The jaggery that needs to be used is a palm jaggery called kithul jaggery. It's a little hard to find but it has a characteristic flavor that's hard to reproduce. Regular jaggery simply doesn't have the smoky flavor and it's not sweet enough.

The CC found it in London of all places which led someone to remark, "What does the CC do in London? He buys Sri Lankan jaggery and hauls it back to New York." This has irony written all over it since the CC was in Sri Lanka earlier in the year and didn't haul it back then. However, the bottom line is "Globalization, baby!"

The dessert is traditionally steamed but you can easily make it in an oven with a water bath as long as you have large pans. It also scales effortlessly. Best of all, it needs to be made ahead of time and cooled so you will be able to impress your guests without much effort.

It's just pure magic.


Ingredients

(serves 4)

100 gram kithul jaggery
200 ml coconut milk

2 cloves
1 large stick cinnamon
1 vanilla pod
3 cardamom pods
nutmeg

5 large eggs (read notes!)

Note 1: The jaggery is conveniently sold in 100 gram units wrapped in the dried palm leaves.

Note 2: The amount of milk in a standard can of coconut milk is close to 200 ml. Good enough. This recipe is quite forgiving. Shake it well before opening.

Note 3: The CC has seen pandanus leaves (called rampe in Sinhalese) added to the coconut milk. Great taste if you have some. Can be found frozen and work like a charm.

Note 4: The jaggery is quite hard and tradition calls for shaving it. The CC smashed it with a hammer and used the pieces. It made no difference since it dissolves completely and you will filter the product anyway. Tradition frequently wastes time without asking the obvious questions.

Note 5: If you use regular jaggery, you will need 4-8 tbsp of brown sugar to get the right sweetness.

Note 6: There is no way to predict how many eggs will be needed. Firstly, the coconut milks have different amounts of liquid. Secondly, the eggs are of different sizes even within the same grade. Lastly, the yolks are of different sizes. The CC started with four and then was forced to add one more to get it right. Chances are you might need an extra egg or one less. Start with four and go from there.

Recipe

Remove the cardamom seeds from the pod. Crush the cloves and cardamom in a mortar and pestle.

In a saucepan, heat up the ground cardamom and cloves, vanilla pod, cinnamon and ground nutmeg with the coconut milk and the jaggery. Bring it to a boil and turn down the heat to very low. Stir until everything dissolves and the spices steep into the liquid. Roughly 12-15 minutes. This also has the advantage of removing some of the moisture from the coconut milk.

Taste it. It should be cloyingly sweet and the spices should be prominent. (Don't worry. The final product will be nowhere near as sweet. We still have the eggs, remember?)

Strain the liquid into a bowl and let it cool down to room temperature. (Stick it in a freezer if you're in a hurry.) Discard any spices or solids left behind. Make sure that the mixture is cold otherwise the eggs will scramble when you incorporate them.

Beat the eggs but not too much. Don't incorporate too much air into them.

Strain the egg mixture using a fine sieve into the cold coconut milk liquid above. You will need to use a whisk to get the egg mixture through the sieve.

This step is CRUCIAL. The final product will simply not work without it.

Mix the batter gently to incorporate it completely. It should be slightly dense and thick but still liquid.

Split the mixture evenly into four oven-proof bowls. Cover each of them tightly with aluminum foil.

Now, you have two choices.

Steaming: Steam the four bowls in a steamer for 40 minutes. Check at that mark. They should be jiggly. If not, steam for an extra 5 minutes.

Baking: You're not really baking. You will need a deep pan that can hold the bowls. Preheat the oven to 350°F for 10 minutes. Heat some water in a kettle. Place the bowls in the pan. When the oven is heated, and the water is boiling, pour it in the pan around the bowls. Cover the pan itself with a separate piece of aluminum foil and put it in the oven. Steam for 40 minutes. Check. If not jiggly enough, steam for an additional 5 minutes.

The trick with the water is that all the energy is going into vaporizing the water so that the egg mixture itself never goes above the boiling point of water. Very clever and this clearly scales effortlessly.

Let them cool down to room temperature. Chill in the refrigerator until ready to serve. They are frequently topped with more cashews and raisins but this is a bit of gilding the lily.

Saturday, October 24, 2015

Scotch Woodcock

The CC has long maintained that if one wants to have an appreciation for English food, one must look to the period before the Great War (World War I) which destroyed the aristocracy.

Here's a very old recipe with a strange name. However, it's perfectly at ease today in the age of umami even if the 19th century lords wouldn't have heard of the word or the concept.

The recipe is truly spectacular at many many different levels. It's umami-laden which makes it irresistible; it's nutritious and attractive to look it, it has a variety of textures that makes eating it a sheer delight and it's breakfast!

Like all aristocratic recipes, it's a little bit time-consuming (although not as much as you think thanks to modern-day devices and conveniences.)

What is it?

It's excellent bread (or sometimes toast) that's lavishly spread with anchovy butter on which are piled soft scrambled eggs (made with cream) on which are piled more anchovies and assorted herbs.

It's relatively free-form when it comes to the herbs. English cooking was fairly easy-going with the herbs even back in the day. It could be chives or parsley or even salted capers. Seasonality and all that.

What really makes the clock tick, as they say, is the anchovies. The umami is the rock star and for that you must make the anchovy butter but it's straightforward with a mortar and pestle and a refrigerator — spare some pity for the poor sod that had to churn the mixture with ice to get it "to set" before refrigeration.

The CC's favorite part is that the anchovy butter is called "Gentleman's Relish". Now there's a term the CC could get behind.

Ingredients

Anchovy Butter

4 anchovies
8 tbsp butter

Scrambled Eggs (per serving)

2 eggs
2 tbsp cream
salt
pepper

Misc (per serving)

1 slice rye bread
1 anchovy (neatly separated into two fillets)
minced herbs (parsley OR chives OR capers)

Recipe

Note: This recipe is quite salty from the anchovies. Don't add too much salt in the eggs.

Anchovy Butter

First, make the butter. This is best done ahead of time. Pull the butter out of the fridge and let it soften. Fillet the anchovies, wash to get rid of the extra salt and pound to a paste. When the butter is softened, whip it with a fork till soft (called: "creaming the butter") and fold the anchovy paste in to make a compound butter.

You can take this and make a torchon with some plastic wrap if you want to get fancy, or just put it in a ramekin, cover it with some wrap and place it in the fridge.

This is best done ahead of time. This stuff lasts a long time even though the CC will personally assure you that you will plow through it in no time.

Scrambled Eggs

For the scrambled eggs, mix the eggs with the cream, salt and pepper. Scramble them over high heat so that the curds are relatively large and dry. (This is in distinct difference to the French-style of scrambling eggs which is over low heat where the eggs are soft and creamy and have almost no curds.)

Set aside.

Assembly

Spread anchovy butter over the bread. Pile some of the scrambled eggs on top of it. Put two of the half-anchovy fillets in an X over them. Sprinkle with the herbs and serve.

Saturday, August 22, 2015

Huevos Rotos

After the insane tapas party, the CC needed to make something basic and elemental. He did some searching and, lo and behold, he had all the ingredients necessary for a nutritious and tasty breakfast.

This is not a "fast" dish. However, you don't need to do much. Set the timer and get away.

Best eggs ever. They combine the magic of "home fries" and poached eggs in one easy dish.

You need to serve them with jamon serrano, of course.

Ingredients

(serves 2)

1 large onion (chopped coarsely)
1 green pepper (chopped into matchsticks)
3 fingerling potatoes (chopped into thin rounds)
4 cloves garlic (minced fine)

4 eggs

1/4 cup parsley
1 tsp paprika (agridolce)

olive oil
salt
pepper

Recipe

You need a frying pan that has a lid.

Heat up some olive oil in a pan. When it shimmers, toss in the onion and the garlic. Fry for a bit. Add the peppers and let them fry for a bit. Add the potatoes, turn the heat down to the lowest possible setting and let them cook. Add the paprika, salt and pepper. Let the potatoes cook for at least 25 minutes. Add the parsley and let cook for an additional 5 minutes. (Total of 30 minutes.)

Keep stirring while the potatoes cook. Every 10 minutes is sufficient. No need to break them up.

You will be able to smell the potatoes being done. It's unmistakable.

Spread the mixture evenly over the pan. Crack the four eggs in the four corners. Cover the pan and let cook for 4 minutes. You may need an extra minute but take the pan off the heat once the whites are set.

Serve the poached eggs - two per person with the potatoes below. The yolk will be barely set but that's perfect when you crack it and it coats the potatoes. Enjoy with the jamon in tow.

Sunday, July 26, 2015

The Three-fold Way with Tomato Broth

Let us first be clear what tomato broth is not. It's not a tomato sauce and it's not a tomato soup.

A soup is a full-bodied dish that could be a meal. A broth is a light flavored memory of the original and is watery and thin but full of flavor. The lines are blurred in the middle but seldom has one been mistaken for the other.

Also since we are all friends here, you can't get from one to the other. A broth is definitely not a diluted soup although you can make an intense soup using a broth because it will, no surprises here, intensify the flavor.

Perhaps the best way is to think of broth is intensely-flavored water that has both nutrients and taste.

Now that the CC has gotten that mini-rant off his chest, it's time to proceed.

Tomato Broth

Ingredients

1 medium red onion (diced very fine)
4 cloves garlic (crushed)

1 lb tomatoes (passed through a food mill)
"seasonings" (rosemary, sage, oregano, etc.)

olive oil
sea salt
black pepper

Recipe

Fry the onion and the garlic at very low heat for at least 10 minutes. Add the tomato purée, salt and pepper and fry for a bit. Let it reduce at a low heat for the better part of 20-25 mins. All the taste comes out of this extreme reduction so deal.

Add the water to dilute it to the required consistency, and let it come to a boil.

This is the point in time you can add "seasonings". Let it simmer on a low heat for 20 mins.

You need to pass the stuff through a strainer to get the broth. Dilute further if necessary.

Tortellini en Brodo

Ingredients

1 package tortellini

2 cups tomato broth

"herbs"
salt
pepper

grated parmigiano-reggiano

Recipe

If you are going to make your own tortellini, more power to you. The CC gets his from Raffetto's. There are limits to his ambition.

Cook the tortellini as per the instructions. Undercook by a minute or so. They will get heated up in the broth.

Meanwhile, bring the broth to a boil. Add additional herbs if needed, salt and pepper to taste. Drop the cooked tortellini and let it cook for a minute. Serve with plenty of grated parmesan and black pepper.

Poached Cod in Tomato-Tarragon Broth

Ingredients

2 cod fillets

2 cups tomato broth
1/4 cup chopped tarragon

salt
pepper

Recipe

Note 1: This is the lazy person's approach to dinner. Of course, you would've needed to have made the broth ahead of time but you do have a freezer, don't you?

Note 2: If you have never poached fish before, add 1/2 cup of white wine. The wine and the water will form an azeotrope and lower the boiling point to about 80°C from 100°C which is where water boils. It's a lot more forgiving if you're a "poached fish" newbie.

Heat up the broth with the tarragon. Add salt and pepper to taste. Poach the cod fillets until they are done. (This depends on the size. They are done when you can pierce them with a knife cleanly.)

Poached Eggs in Tomato Broth

Ingredients

4 eggs
dried out crusty bread

3 cups tomato broth

"herbs"
salt
pepper

Note 1:  This is the greatest "hangover" recipe in the CC's repertoire. After a night of carousing, this is both easy on the stomach and wonderfully nutritive (not to mention it provides the much-needed water element.)

This works the same way as the cod recipe above except you poach the eggs rather than the cod.

You serve it over the crusty bread on which you place the poached eggs and gently pour the broth around it. It's amazing to eat the yolk when it breaks over the bread and the broth.

Thursday, July 3, 2014

Hiyashi Chūka (冷やし中華)

Literally "Chilled Chinese", this is the summer dish in Japan that only shows up on menus when the summer heat turns oppressive. Restaurants love it, since except for the ramen, the dish consists only of assembly. All the components are pre-made and chilled down ahead of time.

It's exactly as rock-star as it sounds. Perfect cold dish for the insane summer heat just like this week here.

There is an ugly fact here that is going to upset most readers.

Precision of effect frequently requires substantial expenditure of means.

Each piece needs to be precisely made, cut up, and "chilled" and then the whole gets put together. It's not at all hard but it does go against that "effortless" summer dish mojo.

So why is the CC sabotaging his own readership with something that takes effort?

The answer is the sheer awesomeness of the dish with ingredients that can be stored for another day.

What is it?

It's cold noodles with a umami-laden gingery sweet-and-salty sauce and cold toppings. Unlike salads, the sauce sits at the bottom of the dish. You mix whatever ingredients you like for the "next slurp" and, let's face it, you need to slurp the ramen, people! The ingredients have been arranged at the top for visual interest not for "mixing". Each mixed-up slurp is going to be unique and umami-laden thanks to the personal mixing and the sauce.

The dish can only be described as "cold magic for a hot summer's day".

It is absolutely modern and in spite of its name it's no more "Chinese" than the CC is. It's Japanese through and through. The name is advertising. Every culture likes "foreign" stuff because exotic stuff sells and this dish fits the bill. It could never have existed before the age of refrigeration. The tastes are purely Japanese and only the noodles are "kinda sorta vaguely" Chinese. Don't let the name fool you.

(There's a general trend here. Names of dishes that contain a country/place rarely originate in the country/place named. For example, French Fries, Chinese Chop-Suey, Pad Thai, Baked Alaska, Hamburger, etc. This list is long!)

The dish follows the rules of washoku (和食) even though it is not really traditional. Five flavors; five colors; visual interest.

Typically, you would work with five ingredients plus the ramen but the CC had most of the stuff in his apartment; he was bored, and he is a little bit crazy (Really?!? Who'd think that?)

Let's enumerate the ingredients starting from the "6 o' clock position".
  • Simmered lotus roots.
  • Simmered shiitake mushrooms in savory sauce.
  • Wakame.
  • Eggs cooked "mollet".
  • Pickled carrots with sesame.
  • Crab-stick.
  • (Egg).
  • Crab-stick.
  • Cucumber.
In the center we have cherry tomatoes, strips of nori and "Chinese chives" (nira - にら).

There is one deviation that makes it "modern modern" (to ape the modern way of talking.) Traditionally, the eggs would have been cooked in a Japanese-style omelette and cut into strips. The rest is pretty much conventional.


As pointed out the dish is a game of assembly. Each of the ingredients was cooked or cut up and chilled in the refrigerator. When the time came to serve the dish, the ramen was cooked and quickly chilled in ice-water and the dish assembled. It's also easiest if you just chill the plates in the freezer ahead of time. That way everything stays cold.

Everything serves two but you are welcome to make more and store it. Each cooked component stores really well and you can always quickly cut up the other stuff in a few minutes.

Also if you read the recipe carefully, the sequence in which to make things is clearly to make the dashi first, then simmer the crab sticks, then the lotus roots, then add the ingredients to make the mushrooms, and use the reduced sauce as a component in the dipping sauce. That way everything gets used up and no flavors are wasted.

This sort of complex sequencing is really the heart of many "hard" dishes. In order to not repeat things, you must sequence them out correctly up-front.

Vegetables

Ingredients

8 cherry tomatoes
1 small cucumber
Japanese-style pickled carrots (just use fresh if you don't have this)
4-5 Chinese chives

Recipe

Cut the tomatoes in half. The cucumber, carrot and chives must be cut into long thin strips. Set aside and chill.

Seaweed

Ingredients

1/2 tsp dried wakame
1 sheet nori

Recipe

In a small bowl add cold water to the dried wakame. The nori must be cut into fine strips. You can drain the wakame just before assembly.

Crab Sticks, Lotus Roots & Egg

Ingredients

2 cups dashi
4-5 crab-sticks
1 small lotus root.
1 egg

Recipe

The crab sticks are generally frozen. Bring the dashi to a boil and cook them for about 3 minutes. Lift out and set aside.

Add the lotus roots to the dashi and let them cook for about 4-5 minutes. Lift them out and set aside.

Cook the eggs mollet-style in a separate pot with some water. 7 minutes. Immediately plunge them into an ice bath. Peel when cooled and set aside. You can slice them right before serving.

Simmered Mushrooms

Ingredients

8 dried shiitake mushrooms.
1 cup dashi
4 tbsp. soy sauce
2 tbsp. brown sugar

Recipe

Combine the ingredients and bring to a boil. Let it cook uncovered for about 8 minutes until the shiitake mushrooms are cooked through. You can reduce the sauce and use it in the dipping sauce.

Dipping Sauce

Ingredients

1/3 cup dashi
2 tbsp. soy sauce
2 tbsp. black sugar
2 tbsp. sesame oil
1 tbsp. grated ginger

Recipe

The measurements are a little approximate. Mix everything together like a vinaigrette. You will need to taste it and make sure it has the right balance of sweet and salty tastes. The dashi will provide the intense umami.

Ramen

Ingredients

2 packages frozen ramen
2 tbsp. roasted sesame seeds

Recipe

NOTE: The frozen ramen available in the Japanese grocery store are the preferred ones. They are the ones made traditional-style with alkaline water. They will look pale yellow.

Roast the sesame seeds on a medium-hot skillet until they are golden and set aside.

Prepare an ice-bath. Then in a large pot, bring water to a boil and add the frozen ramen. Cook as per the instructions. The ones the CC had said 2 minutes and 30 seconds. Yes, this level of precision matters.

Immediately drain them and plunge them in the ice-bath to ensure that they stop cooking and chill down. Drain.

Now assemble everything. Ramen in the center. Pour the sauce over it. Add the toppings all around. and on top. Strew the sesame seeds all over. Serve at once.

Saturday, December 21, 2013

Kookoo Sabzi

This is not a difficult dish but it requires effort. The CC assumes that everyone understands the difference between the words "difficult" and "effort".

Ideally, this dish needs a buncha Jamie's in the house all shredding the greens to precise effect. In their collective absence, you'll just have to shred them yourselves (or get a personal Jamie to do it — you do have one, don't you?)

The goal is an almost insane amount of fragrant greens all held together by just the barest amount of egg. This is an "inversion" of the frittata which features eggs as the main ingredient. Here the eggs are just there to hold everything together and they are cooked to a dark brown. The greens, barberries and nuts are the stars not the eggs. We are clear on this concept, aren't we?

It's best served with a sweetish side salad — Green on Green — there's a hit album in here!


Ingredients

All the cup measurements are after the chopping. This means that, yes, there's almost an insane amount of greens but we were clear on that, right?

2 cups Italian parsley (finely chopped)
2 cups dill (finely chopped)
2 cups chives (finely chopped)
1 cup cilantro (finely chopped)
1 cup mint (finely chopped)

4 tbsp. dried fenugreek

1/2 cup.barberries (zereshk)
1/2 cup. walnuts (chopped)

2 tbsp. flour
2 eggs — keep an extra egg or two around.

saffron
milk

salt
black pepper

Recipe

Note: Most recipes online call for turmeric not saffron because the latter is very expensive. However, there is no substitute. Use the real thing. This is for the betterment of your soul.

(The recipe was traditionally served at Nowroz — the New Years' Day because of the obvious metaphor between greens and prosperity.)

Preheat the broiler.

Heat the milk gently. A microwave works great as long as you don't let the milk spill over. Dissolve the saffron in the milk.

Beat the eggs with the flour, saffron, milk, salt and pepper. Add all the greens.

The CC has found it practical to add an extra egg if the mixture looks too stiff. It's very hard to predict this given the variability in the moisture of the greens and the size of the eggs. The mixture should barely hold together.

In a skillet, heat up some oil at medium-high heat. Add the mixture to the pan and cover. Cook for about 12-16 minutes.

At this point you can either flip the omelette or just put it in the under the broiler like the CC does. The top will turn beautifully golden and green.

Let it sit for about 5 minutes. (Yes, this matters and if you don't know why then you really need to read this.)

Slice and serve.

Sunday, November 18, 2012

Things that make you go hmmm ...

Have you ever read a recipe in a cookbook and said to yourself, "There's no fuckin' way that can work!"?

Happens to the CC all the time. He then ends up yelling at the book which classifies him as one of the crazies but that's him, isn't it?

It comes with experience to all cooks even if you are not familiar with the cuisine in question. It's frequently just a matter of timings which have clearly not been tested and/or are more than a touch speculative. The amount of the sizes could also be all bollocksed to high heaven (tablespoons instead of teaspoons is all too common), or the proportions could be upsized and upchuck-worthy. (4 cups of water in 1 cup of flour will not yield a dough — it will yield a liquid mess!)

Here's a classic blooper from Lathika George's "The Kerala Kitchen".

(In the parlance of our time, this bitch be smokin' some serious crack!)

It's a classic egg curry found all over India. You hard-boil some eggs and separately make a curry. At the end, you cut the eggs length-wise and mix with the curry, re-heat and serve. Hardly complicated.

The trick that makes this specific recipe work is the same trick that makes classic French Onion Soup work. It requires a mass of onions to be browned and then a whole ton of spices and tomatoes are added to it. This turns into a dry curry.

The recipe in the book calls for the onions to be fried for 2-3 minutes and after that, the tomatoes to be cooked for two minutes.

In your fuckin' dreams, lady!

Even twenty minutes is too little for this to work. The last time the CC made a French Onion Soup, it took more than an hour for the onions to do their magic.

This is the principle of IST (Indian Stretchable Time) applied to cooking where five minutes really means fifty. (A lot of cultures have this principle encoded as a joke. There is even the concept of NST used by the "suitable in-crowd" and the CC will not translate that particular one.)

Now admittedly, this stuff is cooked at medium-high heat instead of the relatively gentle burble of the onions for the soup and the soup calls for a vastly larger number of onions but still. There is absolutely no fuckin' way in hell a mass of onions plus tomatoes is going to give up all that moisture in a total of five minutes. Incidentally, that's what frying really is — a precise way to remove moisture.

A significant fraction of this can squarely be blamed not on the author but on the editors. You needn't look towards the travesty of Rachael Ray and Sandra Lee. They are just the logical culmination of something that has been going on since Edouard de Pomiane in La Cuisine en dix minutes, ou l'Adaptation au rythme moderne.

We like speed. We like convenience. Cooking can be a chore even for the most committed amongst us. We are, alas, all too human.

Except that Pomiane was a genius. He clearly states what can and can't be hurried up and his entirely elegant solution for "hurrying up" is that if a recipe can't be hurried up, you shouldn't make it or serve it to your guests on a weeknight. Genius!

Pomiane's book is hands-down a work of a master and someone deeply steeped in the art of cooking. You will learn better from him how to make a classic sauce hollandaise than from all the textbooks and French chef's of the world. He has idiot-proofed something that is considered a "junior chef's challenge". (Science is why his technique works and since he was a physician and microbiologist, chances are that he understood in detail what he was doing.)

Editors, listen up! There is no shame in saying that something takes thirty minutes instead of three. There's no fuckin' shame in explaining in simple terms the science behind a recipe. People are smarter than you think and those that are likely to buy an obscure cookbook are much more likely to spend thirty minutes than three.

So don't try and push it. Not only do you get a travesty of a recipe but also you get an inedible fuckin' mess!

Isn't this entirely obvious?

So here's the classic egg curry from Kerala reworked for your benefit.

(And yes, the CC used a timer to time it as opposed to the gormless Ms. George who clearly did not test worth the proverbial Indian dam!)

Egg Curry

Ingredients

6 eggs (hard-boiled)

3-4 cups onions (very thinly sliced)
2 tomatoes (finely diced)

12 curry leaves
1 tbsp ginger (chopped into very thin slivers)
4 cloves garlic (sliced thin)
3-4 chillies slit lengthwise

1 tsp turmeric
1 tsp chilli powder (or to taste)
4 tbsp black pepper
salt

Recipe

First make the eggs. Cover them in cold water. Bring them to a boil and turn the heat to low. Cook for 8 minutes. Remove and immediately dunk into an ice-bath to cool off.

You will get perfectly hard-boiled eggs without the yolk turning chalky and none of the green sulfurous ring around them.

Peel them and set aside.

Combine the turmeric, salt, chilli powder and black pepper with a few tablespoons of water to make a thick paste. Don't add too much water.

Heat up some oil and when heated (7 mins) dump in the mass of onions. Let fry on a medium-high heat until they change color but are not blackened. Roughly 17 minutes.

Twenty-four minutes and counting.

Dump in the curry leaves, ginger, garlic slit chillies, and let fry for a bit (3 minutes.)

Add the tomatoes and spice paste. You may need to add some water to make sure it doesn't burn. Let cook at a low heat for about 8 minutes until the tomatoes turn saucy.

We're up to 35 minutes now, you clueless bitch!

Cut the eggs length-wise into halves and add them yolk-side up and let them gently heat up to the sauce. About 3 minutes. Serve.

So nearly 40 minutes not counting the time to make the hard-boiled eggs.

Sunday, September 16, 2012

Tortang Talong (Eggplant Omelette)

Summer means eggplant, and there's no better way to start off a Sunday than with this sublime combination of smoky eggplants and eggs.

Incidentally, the Filipino world is divided into those that add ground pork as a topping, and those that don't. The CC refuses to take sides in this particular debate. De gustibus ..., etc.


Ingredients

(serves 2)

2 eggplants
2 eggs

1 tbsp patis (substitute with salt)
oil

Recipe

Grill the eggplants until the skin is charred. If you don't have a grill (like the CC), stick them directly on top of the flame of the burner. Keep turning until it is nicely charred. Set aside.

When cool, the skin will peel off quite easily.

Gently smash the eggplant with a fork into a flat roundish shape (like the picture above.) Try not to puncture it. (If you do, don't worry too much. The eggs will seal it.)

In a separate bowl, crack the eggs. Add the patis and whip till blended.

Each eggplant will be dipped in this mixture and pan-fried.

Heat some oil in a skillet. When shimmering, add the egg-dipped eggplant. As the egg sets, you will need to gently wrap it around the eggplant.

Serve hot. (The topping above is Sriracha, of course!)

Saturday, September 8, 2012

Ginisang Ampalaya (Sautéed Bitter-Melons with Egg)

This one is for the bitter melon lovers out there. (You know who you are.)

It's a straightforward Filipino breakfast dish. You sautée some bitter melon rounds with onions, patis (fish sauce), garlic, black pepper and eggs.

You can add ground pork, or not. You can add bell peppers, or not. You can add tomatoes, or not.

There's a lot of that "or not" in Filipino cooking.

Only constant here seem to be that it wouldn't make any sense to have a sautéed bitter melon dish without bitter melons, would it now?

Also, the eggs are key. They act as counterpoint.

The eggs were lightly scrambled because that's the way the CC rolls.

You may want to roll differently, or not.


Monday, February 27, 2012

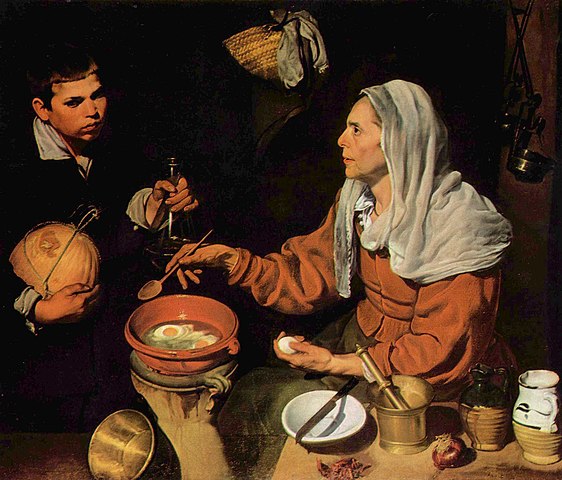
An Old Woman Fries Eggs

One of the great paintings by Velázquez is that of an old woman frying eggs while a young boy looks on and helps her.

The wonderful chiaroscuro is a joy to behold with the light appearing to come from the left. It was painted during his Seville period.

(Source of painting: Wikipedia.)

But what is she doing?

She is making huevos fritos con puntilla. These are eggs fried in hot olive oil where the oil is flicked around the edge of the egg to achieve a delicate lacey frill like that of a traje de Sevillana.

The evidence is the hot oil that she should be flicking over the edges of the egg whites with her wooden spoon. This is a reasonably high-risk procedure with the chance of hot droplets of oil splashing all over. Her right sleeve covers her hand to protect it but not her left. Most importantly, since this procedure can easily make the egg whites overcooked without the yolk having set, she seems instructing the boy to add a slug of olive oil to the earthenware cooking pot to cool down the oil.

She seems to be about to speak to him but his interest seems to have wandered. He just wants his abuela to make the damned eggs, and enough with the instruction already.

The eternal drama of youth and old age captured in a succint way!

Sunday, June 26, 2011

Goodness Gracious, Great Scapes of Garlic!

Nothing screams summer like the first garlic scapes. Clearly, the CC went just a tad overboard when he bought ten of them so it was inevitable that he would put them to good use.

If you've never had them, they have the mild pungency of garlic but a texture like that of asparagus stems which makes them quite versatile.

Garlic-Scape Fritatta
Ingredients

2 garlic scapes (sliced real thin)
1 carrot (grated
3 eggs
1/4 cup grated parmigiano-reggiano
sea salt
black pepper

Recipe

Heat the broiler.

Mix the ingredients. Heat a skillet at medium low heat. Toss in the mixture. When barely set (30 seconds) stick under the broiler for about 2 minutes.

You will need to keep checking when it's done otherwise it will burn. The bottom will set automatically because of the residual heat from the skillet.

Garlic-Scape Risotto
Recipe Logic

The CC had garlic scapes so the idea of a garlic scape risotto was never far from his mind.

To add to the rustic taste, some mushrooms would be ideal. The CC happened to have large Chinese shiitake mushrooms which would augment the taste of the garlic scapes with their earthy flavor.

However, the dish would be too monochromatic visually and texturally incomplete so to punch it up a notch, the CC thought about adding a truffle breadcrumb topping. The truffles would complement the earthiness of the garlic scapes and mushrooms and add a textural component to the dish.

The silky risotto punched up with crunchy salty breadcrumbs is a wonderful early summer delight.

Ingredients

1 cup carnaroli rice
4 garlic scapes (cut into medium pieces)
1 head spring garlic (diced fine)
4 fresh Chinese shiitake mushrooms (cut lenghth-wise into thick strips)
2 cups white wine (one for the recipe, one for the chef)

3 cups broth

breadcrumbs
truffle salt
olive oil
1 cup grated parmigiano-reggiano
sea salt
black pepper

Recipe

Fry some breadcrumbs in olive oil and set aside on a paper towel to drain. When cool, add in some truffle salt and powder with a mortar and pestle.

The recipe follows the standard risotto template. Bring the broth to a boil and keep warm at a very low simmer.

In a separate pot, heat up some olive oil and fry the spring garlic at a medium heat (4 minutes.) Add the garlic scapes and fry for a bit (2 minutes.) Add the mushrooms and the rice, and fry for a bit (4 minutes.) Add the salt and pepper

Toss in the white wine and deglaze. Add a ladleful of the hot broth, and keep stirring. When the broth gets absorbed, add another and keep stirring. Broth and stir, broth and stir.

Towards the end, toss in the parmesan for the mantecura.

Serve with the truffle-breadcrumb topping.

Sunday, June 12, 2011

Summer Frittata

Saturday, June 11, 2011

Summer Haul

Sorrel, garlic scapes, chives, zucchini, eggs.

Summer is here!!!

Saturday, May 14, 2011

Early Riser

Waking up before the sun is overrated.

When the CC got to the farmers' market at 8:00am, they were barely unpacking. After a fruitless (!) 20 minutes pondering the silence of New York, he finally got his goodies.

Asparagus, spring onions, and eggs.

Spring is finally here!

Saturday, May 7, 2011

Nasi Lemak

Thursday, April 21, 2011

Soba with Miso

This is a classic example of Japanese nabemono which are "one pot" dishes.

nabe (pot) + mono (food) = nabemono "one-pot food"

Which tells you right away that it's for regular consumption, and relatively straightforward.

One of the important things to note about this format is that it is endlessly malleable. This is the criterion by which cultures save themselves from boredom. Once, you get the knack of it, and the rules of the washoku which seem to arise from both an aesthetic and a nutritional perspective, you can shuffle this stuff endlessly and not repeat yourself in a year.

The dish may seem to have a lot of ingredients and it may "seem" complex but it really is not. You could assemble it fairly easily with about twenty minutes of effort. It will take about an hour in real time but you can spend most of it with your feet up with a glass of wine if you so choose.


Ingredients

4 cups dashi
tofu
1 carrot (cut thin at a steep angle)
1 cup spinach
8-10 shiitake mushrooms

2 tbsp miso paste

2 scallions (sliced at a steep angle)
hijiki (soaked cold for 30 minutes)
wakame (soaked cold for only 5 minutes)

2 eggs
mirin
soy sauce
rice vinegar

soba

Recipe

First prep the egg. Mix the egg with 2 tbsp mirin, 1 tsp soy sauce and 1/2 tsp rice vinegar. Make a very thin omelette on medium-low heat and set aside.

When cool, roll it tight and slice it into thin rounds.

Assemble the ingredients in a pot — tofu, carrots, spinach, shiitake mushrooms, soba. Heat the dashi with some mirin and pour it over the mixture. Bring to a low boil. After about 10 minutes, turn off the heat. Stir in the soy sauce (to taste) and the miso.

Do NOT boil after adding the miso.

Serve with the scallions, hijiki and wakame as toppings.

Sunday, February 20, 2011

Ode to an Omelette

A paean must be written to the very French concept of barely set eggs. They may be in various forms — poached, baked, omelette but the key point is that they are barely set. Just at the edge of being cooked but basically somewhat raw.

In the interest of hygiene, the CC must mention that you can't do that with commercial eggs in this country.

You need freshly produced eggs from an good organic producer that you know personally otherwise you are out of luck!

However, if it's possible to source these in the heart of Manhattan, the CC fails to see what the excuse is?

Even if you have excellent organic local eggs, you must first wash each and every one of them before you crack them. The logic is that these wonderful organic eggs may not have bacteria on the inside but like all "stuff" they have bacteria on the outside!

Yes, this may sound pain-staking but it's absolutely necessary if you are gonna barely cook them. Also, these organic eggs tend to be a tad fragile unlike your supermarket force-fed chicken eggs so a little gentleness is needed.

Just try it.

The CC never liked soft-boiled eggs until he made high-quality ones for himself. Now, he recoils at the idea of eggs being overcooked.

Oh, and make sure to have some crusty bread at hand to soak up all the eggy goodness!


Sunday morning. Ooey-gooey goodness. Happiness.

Saturday, December 11, 2010

Saturday Morning

Nothing like some soft scrambled eggs (low heat, folks, extremely low heat) with some oregano pesto.